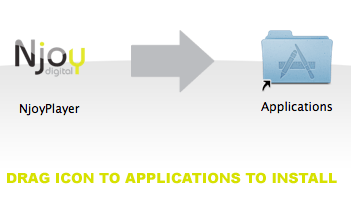
Creating the template :-) First, we’ll start by specifying how our disk image should look when it is mounted (and opened). If you don’t need a fancy look, you can skip this section; the Makefile provided at the end of the page will automatically create a default template if you don’t create one yourself. Of course it’s weird to want fancy disk images but when used for a while it’s quite a relief. It’s just a unix mounted folder.
I could explain how to intstall Mac OSX applications to a first time mac user in 10 seconds: Drag the cool shiny applications icon to the Applications folder with the little arrow in it 0-). That’s it. If and old version of the application exists you will get a prompt asking if you want to update, use both or cancel the “app install”.

So fancy disk images is a nice thing to do for most of your application users; here we go:
- Using Disk Utility (which comes with Mac OS X), create a new disk image, and call it InstallerTemplate.dmg. Select a size which is more than enough to store the contents you plan to put in the final DMG. The Encryption and Format settings (None and r/w respectively) should be left untouched. Then, create your image by clicking Create.
- Open the newly created image.
- From the View menu of Finder, choose Show, View Options. You can now customize the way your folder will look. Be careful, don’t forget to select “this window” only, such that your changes will only apply to the current folder. Using the View menu, you can change the looks of the window even further. Also note that, if you choose a background picture, the picture file must reside in the image itself. It is common to create a (hidden) directory .background in the root dir of the image, dropping the background picture there, and then selecting it as a background. Use Cmd-Shift-G in combination with the full path (e.g. /Volumes/InstallerTemplate/.background) to open the hidden directory in Finder and copy your picture there (or, alternatively, use Terminal). The select button in the View menu seems to open the .background dir by default if it exists. If not, also use Cmd-Shift-G. This was a cool “wow, prffp, zop -> I didn’t know the Cmd-Shift-G keycombo to get to hidden linux folders in MAC OS X the graphical way, which proves to be quite handy when using a mac/linux hybrid :-)”
- Drag all your .app files you want in your image into the volume, and place them exactly where you want to. So in our case we use our .app folder from the build an just copy it into the mounted templateInstaller folder. Assign icons to the files by control- clicking on the icons, and using the Show Info dialog. If your using a .app your icons and you use .plist file with an icon location the icon should already appear by itself.
- Customize the icon of the disk image in the same way as the other icons, only this time by control-clicking on the disk image icon on the desktop.
- Eject the disk image.
you could want to compress it using bzip2. This is not strictly necessary, but if you created an initial disk size of 256M, using bzip2 you can reduce this to only a couples of Mb’s If all went well, you should now have a InstallerTemplate.dmg(.bz2) which, when you open it, has a custom icon on the desktop, and looks exactly how you would like the final disk image to be. Now all we need to do is fill it up with the right files.
Building the final DMG The easiest way to create a final DMG is by doing it by hand. All you have to do:
- Open Disk Utility (in Dutch version of OS X look for “Schijfhulpprogramma”)
- Select the image you created in the previous step : InstallerTemplate.dmg
- Select Convert... from the Images menu
- Enter the name you want your final image to get
- Select Compressed as your Image Format
- Click Save
That’s it, your final DMG should be ready for distribution. Other mac users just have to double click it; and drag the application icon to the other icon.
Related Posts
Quick Links
Legal Stuff
